Research Reports
Navigation: RootsMagic 8 > Reports And Charts >
Repository List
This report lists the repositories and items linked to each repository.
To print a repository list:
- Select the Publish page
- Select "All reports and charts"
- Select "Repository List"
2.
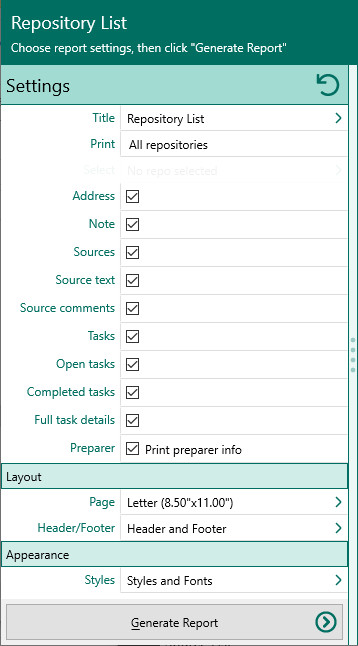
Select your options from the Reports Settings panel:
a.
Print all repositories in database – Select this option to print a list of all the repositories in the database.
b.
Print a single repository – Select this option to print a single repository. Click the "Select" button to choose the repository.
c.
Address – Mark this to print the full address for each repository.
d.
Note – Mark this to print the note for each repository.
e.
Sources in repository – Mark this to print the sources in each repository.
i.
Actual text from source – Mark this to print the actual text from each source.
ii.
Comments about source – Mark this to print the comments about each source.
f.
To-do tasks at repository – Mark this to print all the to-do tasks for each repository.
i.
Open tasks – Print open to-do tasks.
ii.
Completed tasks – Print completed tasks.
iii.
Full details – Print the full details about each to-do task.
g.
Correspondence with repository – Mark this to print all correspondence with this repository.
i.
'Sent' correspondence – Mark this to print correspondence you sent to the repository.
ii.
'Received' correspondence – Mark this to print correspondence you received from the repository.
iii.
Full details – Print the full details about correspondence with the repository.
h.
Print preparer's name/address – Mark this checkbox to print the preparer's name and address at the end of the list. You enter the preparer's name and address from the "Tools, File options" dialog.
3.
- Choose the various layout and style settings for the report
4.
Click the "Generate Report" button to generate the report and display it in the Report Viewer. From there you can modify the report settings, send the report to your printer, save the report to disk, or email the report.
Research Notes
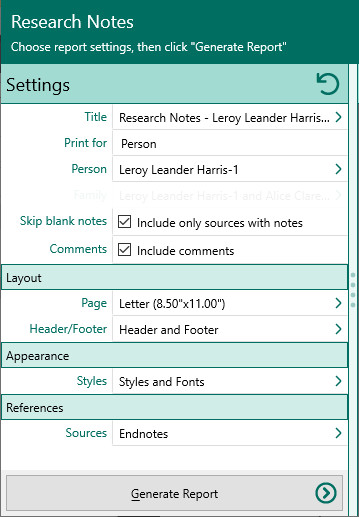
- Select the Publish page
- Select "All reports and charts"
- Select "Research Notes"
- Choose the various layout and style settings for the report
Source List
Prints a list of sources in your database, as well as citations and repositories for each source.
To print a source list:
- Select the Publish page
- Select "All reports and charts"
- Select "Source List"
2.
Select your options from the Reports Settings panel:
a.
Print all sources in database sorted by – Select this option to print all of the sources in the database. You can choose whether to sort the list by Source name (the default), Bibliography, or your personal Source file number.
b.
Print a single source – Select this option to print a single source. Click the "Select" button to select the source you want to print.
c.
Short Footnote – Mark this to print the short footnote version of each source (in addition to the full version).
d.
Bibliography – Mark this to print the bibliography version of each source (in addition to the full version).
e.
Source text – Mark this to print the actual source text for each source.
f.
Source comments – Mark this to print the source comments about each source.
g.
Repositories – Mark this to print the repositories for each source. You can also choose to print the address for each repository.
h.
Citation details - Mark this checkbox to print all citations for each source in the list.
ii.
Detail text – Mark this to print the actual text of each citation.
iii.
Detail comments – Mark this to print any comments about each citation.
iv.
Citation quality – Mark this to print the citation quality for each citation.
i.
Print private facts – Mark this checkbox to indicate you want to include facts that are marked private.
j.
Print preparer information - Mark this checkbox to print the preparer's name and address at the end of the list. You enter the preparer's name and address from the "Tools, File options" dialog.
4.
- Choose the various layout and style settings for the report
5.
Click the "Generate Report" button to generate the report and display it in the Report Viewer. From there you can modify the report settings, send the report to your printer, save the report to disk, or email the report.
Task List
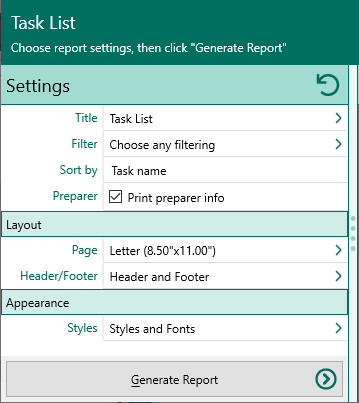
- Select the Publish page
- Select "All reports and charts"
- Select "Task List"
Research Log
- Select the Publish page
- Select "All reports and charts"
- Select "Research Log"


