Difference between revisions of "RootsMagic 8:Narrative Reports"
Jump to navigation
Jump to search
| Line 23: | Line 23: | ||
##Date format | ##Date format | ||
##New page for generations | ##New page for generations | ||
| − | ##Include notes | + | ##Include notes - Mark this checkbox to print the notes for the person. |
| − | ##Include photos | + | ##Include photos - Mark this checkbox if you want RootsMagic to print the primary photo for each person. |
##Max photo size | ##Max photo size | ||
##Print uplines | ##Print uplines | ||
| − | ##Color coding | + | ##Color coding - Mark this checkbox to print any color coded people in color. |
| − | ##Print LDS facts | + | ##Print LDS facts - Mark this checkbox to print any LDS facts. |
##Sentence template | ##Sentence template | ||
##Paragraphs | ##Paragraphs | ||
| − | ##Private facts | + | ##Private facts - Mark whether you want to include facts that are marked private or not. |
| − | ##Private notes | + | ##Private notes - Mark this checkbox to print any private notes. |
| − | ##Strip brackets | + | ##Strip brackets – Mark this checkbox to remove the brackets if you choose to print private notes. |
| − | ##Preparer | + | ##Preparer - Mark this checkbox to print the preparer's name and address at the end of the list. You enter the preparer's name and address from the "Tools, File options" dialog. |
#Choose the various <u>[[RM8:Report_Settings|layout and style settings]]</u> for the report | #Choose the various <u>[[RM8:Report_Settings|layout and style settings]]</u> for the report | ||
#Click the "Generate Report" button to generate the report and display it in the Report Viewer. From there you can modify the report settings, send the report to your printer, or save the report to disk. | #Click the "Generate Report" button to generate the report and display it in the Report Viewer. From there you can modify the report settings, send the report to your printer, or save the report to disk. | ||
Revision as of 17:17, 28 September 2021
Navigation: RootsMagic 8 > Reports And Charts >
With RootsMagic, you can generate Descendant or Ancestor narrative reports for the highlighted person. Within these broad categories, there are other options to let you choose the content and/or the type of format for the report.
To print a Narrative (book) report:
- Select the Publish page
- Select "All reports and charts"
- Select "Narrative Report"
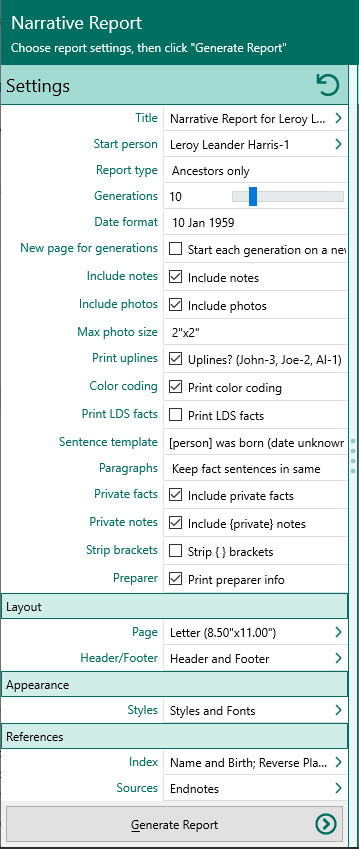
- Select your options from the Report Settings panel:
- Report type
- Ancestors only – ancestors of the highlighted person, without any children of the ancestors
- Ancestors and children – ancestors of the highlighted person, and children of each of the ancestors
- NGSQ (modified register) - A descendant book grouped by generation. Every direct descendant is assigned a number.
- NEHGS (register) – A descendant book grouped by generation. Similar to the modified register, except that unmarried descendants who are not carried forward are not assigned a number.
- Indented - A descendant book grouped by family. Each generation is indented from the previous one. There are 3 types of numbering available for indented books:
- Outline (I, B, 1, j, i, …)
- Henry (121A1, 121A2, 121A3, …)
- D'Aboville (1.2.1.10.1, 1.2.1.10.2, 1.2.1.10.3, …)
- Number of generations to print - Enter the number of generations to print (up to 30).
- Date format
- New page for generations
- Include notes - Mark this checkbox to print the notes for the person.
- Include photos - Mark this checkbox if you want RootsMagic to print the primary photo for each person.
- Max photo size
- Print uplines
- Color coding - Mark this checkbox to print any color coded people in color.
- Print LDS facts - Mark this checkbox to print any LDS facts.
- Sentence template
- Paragraphs
- Private facts - Mark whether you want to include facts that are marked private or not.
- Private notes - Mark this checkbox to print any private notes.
- Strip brackets – Mark this checkbox to remove the brackets if you choose to print private notes.
- Preparer - Mark this checkbox to print the preparer's name and address at the end of the list. You enter the preparer's name and address from the "Tools, File options" dialog.
- Report type
- Choose the various layout and style settings for the report
- Click the "Generate Report" button to generate the report and display it in the Report Viewer. From there you can modify the report settings, send the report to your printer, or save the report to disk.
