|
|
| (9 intermediate revisions by 2 users not shown) |
| Line 1: |
Line 1: |
| − | Navigation: [[RootsMagic_8:RootsMagic_8|RootsMagic 8]] > [[RootsMagic_8:Working_With_People|Working With People]] > | + | Navigation: <u>[[RootsMagic_8:RootsMagic_8|RootsMagic 8]]</u> > <u>[[RootsMagic_8:Working_With_People|Working With People]]</u> > |
| | | | |
| | ---- | | ---- |
| − | Groups lets you predefine groups of people that you can later select to perform some action with, such as printing reports or exporting names, when you want to repeatedly select the same group of people. You would create a "Group" by selecting any group of people, and giving the group a name, which will appear in the Groups list in the sidebar. New groups can be created or existing groups edited. Groups can be used any time you have the option to select people to include – the group name will appear in the selection list. | + | Groups lets you predefine groups of people that you can later select to perform some action with, such as printing reports or exporting names, when you want to repeatedly select the same group of people. |
| | | | |
| − | RootsMagic also provides QuickGroups which let you quickly add, change, or remove people from groups.
| + | There are 2 locations you can view and edit groups: |
| | + | #<u>[[RM8:People_Page#Sidebar|The Groups View on the People page side view]]</u> |
| | + | #<u>[[RM8:Editing_a_Person|The Groups row on the Edit Person form]]</u> |
| | | | |
| − | To create a new Group:
| + | In both places the groups view displays a list of all the groups you have created, with checkboxes to show which groups the currently highlighted person belongs to. |
| | | | |
| − | namedgroups
| + | [[File:RM8_SidePanel-Groups-1.jpg||Groups View]] |
| − | | |
| − | | |
| − | | |
| − | Ø
| |
| − |
| |
| − | In the sidebar, select the Groups tab and click on the Groups button beside the drop down list. The list of current groups are listed in the Named Groups dialog.
| |
| − |
| |
| − | | |
| − | | |
| − | | |
| − | Ÿ
| |
| − |
| |
| − | New – lets you select a group of people using the Select People window. Check those who you want to choose, the click Select.
| |
| − |
| |
| − | | |
| − | | |
| − | | |
| − | Ÿ
| |
| − |
| |
| − | Edit – lets you modify the group of people using the Select People window. Check those who you want to add and uncheck those you wish to remove, then click OK to save the changes, or Cancel to discard the changes.
| |
| − |
| |
| − | | |
| − | | |
| − | | |
| − | Ÿ
| |
| − |
| |
| − | Delete – lets you delete the group. You will be asked to confirm that you want to deleted the selected group shown. Click "Delete group" to delete the group, or Cancel to close the dialog without deleting the group.
| |
| − |
| |
| − | | |
| − | | |
| − | | |
| − | Ÿ
| |
| − |
| |
| − | Rename – lets you change the name of the group. A pop-up dialog will let you enter a new name. Click OK to save the changes, or Cancel to close the dialog without renaming the group.
| |
| − |
| |
| − | | |
| − | | |
| − | | |
| − | Ø
| |
| − |
| |
| − | Click Close to close the dialog. Any new groups will appear in the Groups list.
| |
| − | | |
| − | | |
| − | Select People
| |
| − | | |
| − | The Select People window shows the list of people in your database at the left side, each with a check box to let you select specific individuals. You will notice that it is very similar to the RootsMagic Explorer, but with changes to allow marking and selecting people.
| |
| − | | |
| − | You can resize the dialog by clicking and dragging the edges of the dialog. RootsMagic will remember the size and position the next time you open the dialog.
| |
| − | | |
| − | | |
| − | | |
| − | | |
| − | On the left side of the Select People window is a list of every person in the current database with a checkbox beside each name. As you move through the list on the left, the right side of the Select People window will be updated to show the name, sex, facts, and family members of the highlighted person.
| |
| − |
| |
| − | | |
| − | | |
| − | | |
| − | ‚
| |
| − |
| |
| − | On the upper right side of the Select People window is a list of individual information about the person highlighted at the left.
| |
| − |
| |
| − | | |
| − | | |
| − | | |
| − | ƒ
| |
| − |
| |
| − | On the lower right side of the Select People window is a list family members of the person highlighted at the left.
| |
| − |
| |
| − | | |
| − | | |
| − | | |
| − | „
| |
| − |
| |
| − | You can move to any family member in the database by highlighting the person in the Family Members area and clicking Go to Selected Person. They will be highlighted in the person list and the Individual Information and Family panes will be updated with their data.
| |
| − |
| |
| − | | |
| − | | |
| − | | |
| − | …
| |
| − |
| |
| − | You can modify any information about the highlighted person directly from the Select People window by clicking on the Edit button to open the Edit Person window. After you finish editing the information, you are returned to Select People window.
| |
| − |
| |
| − | | |
| − | | |
| − | | |
| − | †
| |
| − |
| |
| − | At the top of the Select People window are a group of buttons. The function of these buttons is described below.
| |
| − |
| |
| − | | |
| − | | |
| − | | |
| − | o
| |
| − |
| |
| − | Type a name to search – You can easily move to a person in the list by simply typing their name. As you type the name, the highlight bar will move to highlight the name closest to what you have typed. Check on the box beside the person to mark him or her as selected.
| |
| − |
| |
| − | | |
| − | | |
| − | | |
| − | o
| |
| − |
| |
| − | Mark group and Unmark group – click these buttons for a menu of options (see below) to help you select a group of people to mark or unmark. You can use a combination of marking and unmarking operations to narrow down the list the those you want.
| |
| | | | |
| | + | '''Creating a group''' |
| | | | |
| | + | To create a group, click the + on the Groups view, then enter the name for the group. |
| | | | |
| − | Ÿ
| |
| − |
| |
| − | Family of highlighted person – mark or unmark the family. If the person is in several families, i.e. parent with spouse in one (or more) family, or child with parents in another, you will be asked to select which ones you want to apply.
| |
| − |
| |
| | | | |
| | + | '''Adding a person to a group''' |
| | | | |
| | + | Select the person in a person view, then mark the checkboxes of any groups you want the person to belong to. |
| | | | |
| − | Ÿ
| |
| − |
| |
| − | Everyone in the database – the option marks or unmarks everyone, whether they are in the same tree or not.
| |
| − |
| |
| | | | |
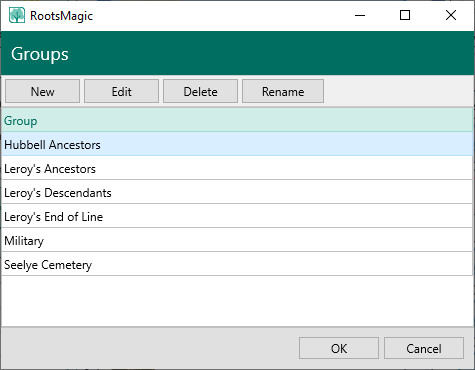
| | + | '''To edit or delete a group''' |
| | | | |
| | + | Click the "Edit Group" (Pencil) button to bring up a form where you can: |
| | + | *'''New''' - Create a new group. You will be asked to enter a name for the group. RootsMagic will then display the <u>[[RootsMagic 8:RootsMagic Explorer|RootsMagic Explorer]]</u> where you can select the initial people to include in the group. |
| | + | *'''Edit''' - Modify the group of people in a group using the Select People form. Check those you want to add and uncheck those you wish to remove. |
| | + | *'''Delete''' - Delete the selected group |
| | + | *'''Rename''' - Change the name of the selected group |
| | | | |
| − | Ÿ
| + | [[File:RM8_EditGroups-1.jpg|Edit Groups]] |
| − |
| |
| − | Everyone in the highlighted person's tree – this option marks or unmarks everyone in the same tree.
| |
| − |
| |
| − | | |
| − | | |
| − | | |
| − | Ÿ
| |
| − |
| |
| − | Ancestors of highlighted person – choose to mark or unmark Direct ancestors only, Ancestors and children of ancestors, Ancestors and collateral lines, and select the number of generations. Click OK to continue with selected options, or Cancel to exit.
| |
| − |
| |
| − | | |
| − | | |
| − | | |
| − | Ÿ
| |
| − |
| |
| − | Descendants of highlighted person – choose to mark or unmark Direct descendants only, Descendants and spouses, or Descendants and collateral lines, and select the number of generations. Click OK to continue with selected options, or Cancel to exit.
| |
| − |
| |
| − | | |
| − | | |
| − | | |
| − | Ÿ
| |
| − |
| |
| − | Genetic lines of highlighted person – choose to mark or unmark the genetic lines of the highlighted person. You can choose whether to follow the Y-Chromosome (Y-STR) line or the Mitochondrial DNA (mtDNA) line, and also whether to follow that line in the ancestor or descendant direction.
| |
| − |
| |
| − | | |
| − | | |
| − | | |
| − | Ÿ
| |
| − |
| |
| − | Select people by data fields – this command uses the "Search for information" dialog to define a select group of people.
| |
| − |
| |
| − | | |
| − | | |
| − | | |
| − | Ÿ
| |
| − |
| |
| − | Living – mark or unmark anyone who is living (i.e. has the living checkbox checked.)
| |
| − |
| |
| − | | |
| − | | |
| − | | |
| − | Ÿ
| |
| − |
| |
| − | Dead – mark or unmark anyone who is not living (i.e. does not have the living checkbox checked.)
| |
| − |
| |
| − | | |
| − | | |
| − | | |
| − | o
| |
| − |
| |
| − | Find (Search by any information) – If you want to find a person (or people) based on information other than the name (such as birth date, death place, etc), click the "Find" button at the top of the Explorer window to bring up the "Search for information" dialog. You can then use the "Prior" and "Next" buttons to move back and forth through the list using the search criteria.
| |
| − |
| |
| − | | |
| − | | |
| − | | |
| − | o
| |
| − |
| |
| − | #Record (Search for a person by record number) – If you know a person's record number, you can quickly move to that person by clicking "#Record", entering the number and clicking "OK".
| |
| − |
| |
| − | | |
| − | | |
| − | | |
| − | o
| |
| − |
| |
| − | Click OK to accept the checked list of people and close the dialog, or Cancel to close the dialog and exit the command.
| |
Navigation: RootsMagic 8 > Working With People >
Groups lets you predefine groups of people that you can later select to perform some action with, such as printing reports or exporting names, when you want to repeatedly select the same group of people.
There are 2 locations you can view and edit groups:
- The Groups View on the People page side view
- The Groups row on the Edit Person form
In both places the groups view displays a list of all the groups you have created, with checkboxes to show which groups the currently highlighted person belongs to.
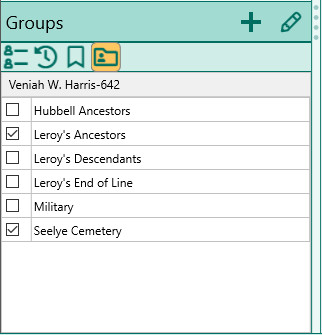
Creating a group
To create a group, click the + on the Groups view, then enter the name for the group.
Adding a person to a group
Select the person in a person view, then mark the checkboxes of any groups you want the person to belong to.
To edit or delete a group
Click the "Edit Group" (Pencil) button to bring up a form where you can:
- New - Create a new group. You will be asked to enter a name for the group. RootsMagic will then display the RootsMagic Explorer where you can select the initial people to include in the group.
- Edit - Modify the group of people in a group using the Select People form. Check those you want to add and uncheck those you wish to remove.
- Delete - Delete the selected group
- Rename - Change the name of the selected group