Difference between revisions of "RootsMagic 8:Labels"
| Line 30: | Line 30: | ||
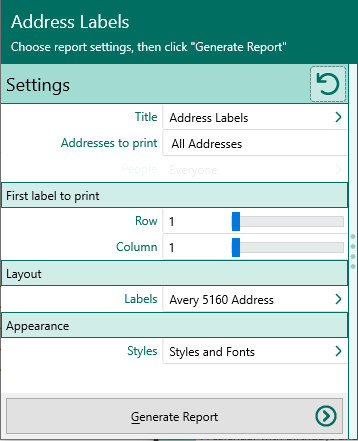
| − | + | [[File:RM8_Publish-Reports-AddressLabels-1.jpg|Address Labels Settings]] | |
a. | a. | ||
Revision as of 14:33, 6 September 2021
Navigation: RootsMagic 8 > Reports And Charts >
Address Labels
Prints addresses from your database on a variety of standard label sizes.
To print address labels:
1.
Open the Reports dialog by selecting "File, Print a report" from the main menu, by clicking the printer button on the toolbar, or by pressing Ctrl+P, and click either "Labels" or "All Reports" from the list on the left side of the Reports dialog.
2.
Choose "Address Labels" from the list on the right side of the Reports dialog, and click "Create Report" to open the Report Settings dialog, or Close to exit the dialog.
3.
Select your options from the Report Settings dialog:
a.
Addresses to print - Choose whether to print all addresses from your database, or to select certain individuals whose addresses you want to print (for example, all descendants of John Doe). If you choose "Selected people addresses", click Select to open the "Select people" screen to let you to choose the people to include by marking the checkbox beside the names of the desired individuals, and clicking OK.
b.
Choose "Label type" from the selection available.
c.
First Label to print – Choose the row and column where you want the first label to print. The default is 1 and 1. This lets you print onto a partial page of labels.
4.
Choose Font to change your settings from the default values. (Click Reset to return all settings to the default settings.)
5.
Click the "Generate Report" button to generate the report and display it in the Report Viewer. From there you can modify the report settings, send the report to your printer, save the report to disk, or email the report.
